- Need Any Help: +1 647-760-5505 or
- info@trubicars.ca
Completing an inspection of an air brake system primarily involves a thorough visual examination of all accessible brake components to ensure they are free from obvious defects or abnormalities. This process is crucial for maintaining the safety and functionality of the vehicle’s braking system. The inspection should be performed regularly to identify potential issues before they lead to brake failure.
When conducting an inspection of the air brake system, it is crucial to use the appropriate safety equipment to protect yourself from potential hazards. This includes:
Inspecting foundation brake components is a critical part of maintaining the air brake system. This process involves a thorough examination of various brake parts to ensure they are in good working condition and free from damage, wear, or malfunction. By regularly inspecting these components, drivers can prevent potential brake failures and maintain the safety of their vehicles. Before beginning the inspection, it is essential to take necessary preparation and safety measures. Drivers should equip themselves with safety glasses, protective headgear, and protective footwear to safeguard against potential hazards. Additionally, the vehicle should be parked on a level surface with the parking brake applied to prevent any movement during the inspection.
Familiarity with the normal appearance and condition of foundation brake components is crucial for effectively detecting defects. Knowing what a healthy brake system looks like helps in identifying abnormalities, and ensuring timely maintenance and repair to avoid brake failures.
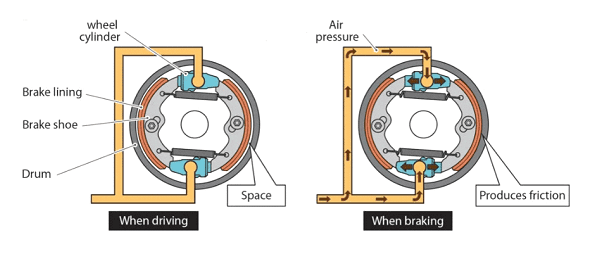
Ensuring proper brake lining to drum contact is essential for the effective operation of a vehicle’s braking system. The brake-shoe lining must press firmly against the brake drum when the brakes are applied, and it must retract and be free from contact with the drum when the brakes are released. This correct contact ensures that the vehicle can decelerate and stop as intended.
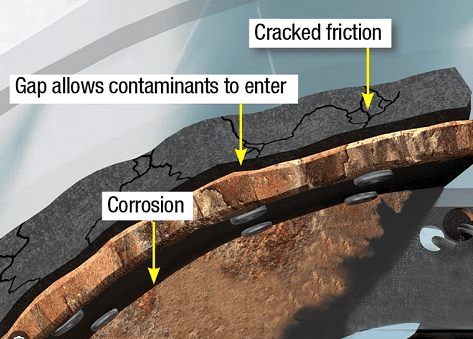
Checking the condition of the brake lining is essential for the proper functioning of the braking system. The brake lining, which is the friction material fastened to the metal brake shoe, must be in good condition and securely attached to the shoe. If the brake lining is noticeably cracked, loose, or missing, it is considered defective and needs immediate attention. Ensuring that the brake lining is intact and properly attached is crucial for maintaining effective braking performance and vehicle safety.
Excessively worn brake linings lead to a condition called “cammed over”. This occurs when the lining becomes so thin that nothing stops the rollers from going past the largest radius of the s-cam lobes as the brakes are applied, making the brakes ineffective.
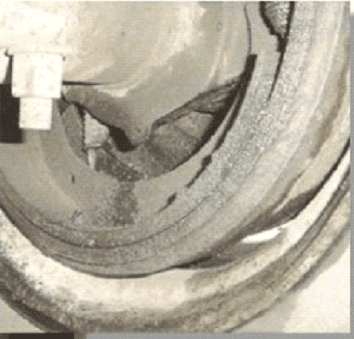
Checking for brake-lining contamination is a critical aspect of maintaining the braking system’s effectiveness. Within the wheel assembly, several components require lubrication to function smoothly. However, when problems arise within the wheel, such as seal failures or component wear, lubricants like grease or oil can escape and come into contact with the brake lining. This contamination can significantly impair braking performance. When grease or oil is present on the brake lining, it leads to abnormal brake behavior, such as reduced friction, inconsistent braking, or complete brake failure. Contaminated brake linings are considered defective and must be replaced immediately to ensure safe and reliable braking. Regularly inspecting for signs of lubricant leakage and addressing any issues promptly is essential to maintaining the integrity and safety of the braking system.
Checking the thickness of brake linings is essential for maintaining effective braking performance and safety. Brake linings are manufactured to standard dimensions, allowing significant wear before needing replacement. However, when the lining becomes too thin, the risk of brake failure and damage to other components increases significantly. Brake lining that is less than the prescribed minimum thickness is considered defective. During an inspection of the foundation brake components, it is crucial to check for several defects, including brake-shoe lining not contacting the brake drum, damaged, missing, or malfunctioning foundation brake components, and cracked, loose, missing, or contaminated brake linings.

The size of an air brake chamber is based on the area of the chamber diaphragm in square inches. The brake on each end of an axle should have the same size air brake chamber to ensure brake forces are balanced. This is even more important for steering axles where brake imbalance can affect the steering. Air brake chambers from different manufacturers may look different even if they are the same size.
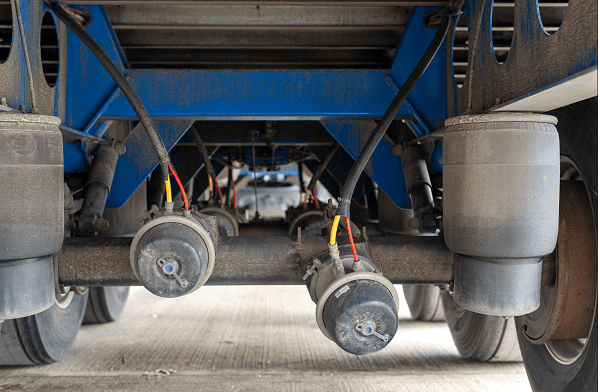
Air brake chambers must be inspected for leaks when air pressure is applied to the chamber. This means inspecting the chamber when the spring brakes are released and the service brakes are applied. Air brake chamber air leaks can usually be detected audibly.
Air brake chambers may have vent holes that are visible. These are manufactured holes and are not a concern. Holes or cracks that are caused by impact or other forms of damage mean the air brake chamber is defective.
The brake chamber is connected to the brake assembly by a pushrod, yoke, clevis pin, slack adjuster and camshaft. Slack adjusters act as levers that increase the force of the air brake chambers. Their effective length is critical. Most slack adjusters are designed with two or three holes for attachment of the pushrod. Attaching the slack adjuster using the incorrect hole changes the slack adjuster’s effective length. The slack adjuster’s effective length is the distance between the centre of the camshaft and the clevis pin. To ensure balanced braking, slack adjusters on each side of an axle should be the same effective lengths. Therefore, when slack adjusters have multiple holes, the pushrods on each side of the axle are usually attached using the same hole.
Some models of slack adjusters use varying patterns of holes that can result in a different appearance on each end of an axle, even when they are correctly attached. The distance between the center of the camshaft and the clevis pin must always be the same on each end of a steering axle.

An inspection of a vehicle’s air brake chambers includes checking for the following defects:
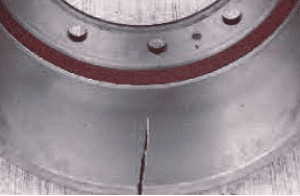
Wheels, dust shields, and other parts of the vehicle can obstruct the view of the brake drums and rotors, making it essential for drivers to conduct a thorough inspection to ensure these components are in good condition. During an inspection, drivers must carefully examine the brake drums and rotors for any signs of damage, such as cracks or breaks. Defective, cracked, or broken drums and rotors often result in noticeable changes in brake behavior, including reduced braking efficiency, vibrations, or unusual noises when applying the brakes. Therefore, it is crucial to identify and address these issues promptly. An inspection of a vehicle’s brake drums and rotors should specifically look for defects such as cracks or breaks, as these can compromise the safety and performance of the braking system.
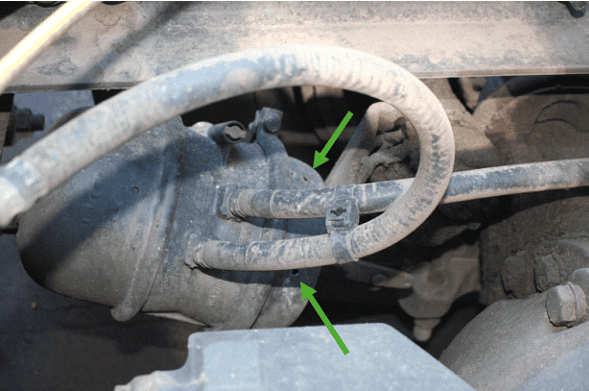
A variety of hoses and tubes make up the air lines used in an air brake system. These air lines are strategically positioned, with some running against the vehicle frame and other structural parts, while others are more exposed and thus more susceptible to damage.
Air lines are designed with multiple layers: an inner layer to create an air-tight seal, reinforcing fabric layers for strength, and an outer layer of plastic or rubber for protection. Some air lines also incorporate steel reinforcing layers.

Damage to the outer layer can lead to wear or holes in the inner layers, which in turn can cause air leaks. Even if no leak is currently evident, damaged or worn air lines are a concern and need attention. When damage extends into the reinforcing or inner layer, the air line is considered defective. In some designs, different colors are used in the layers to indicate when wear has penetrated through to a deeper layer.
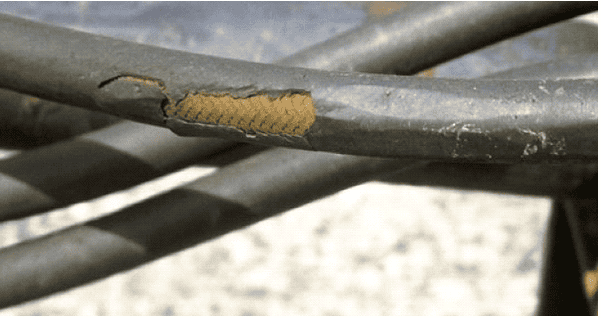
Damage or deterioration to brake hoses and tubes can manifest as wear, cuts, abrasions, or heat damage. Air leaks are usually detectable audibly, and moving the hoses and tubing back and forth often helps to pinpoint the leak’s exact location. It is crucial to use fittings specifically designed and approved for air brake systems. Using improper fittings, or connecting or repairing air lines by improper means, is prohibited as it can compromise the system’s integrity.
An inspection of the vehicle’s air lines should include checking for the following defects: audible air leaks, damaged or worn air lines, and improper fittings used to connect or repair an air line. Addressing these issues promptly is vital to maintaining the safety and reliability of the air brake system.
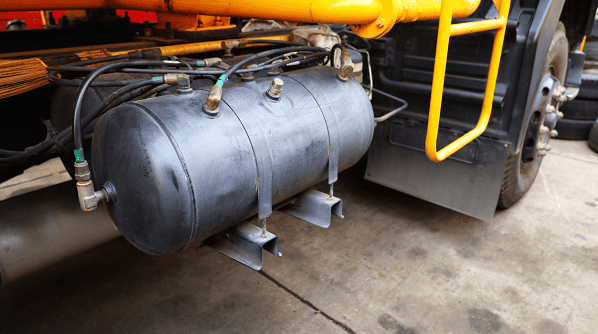
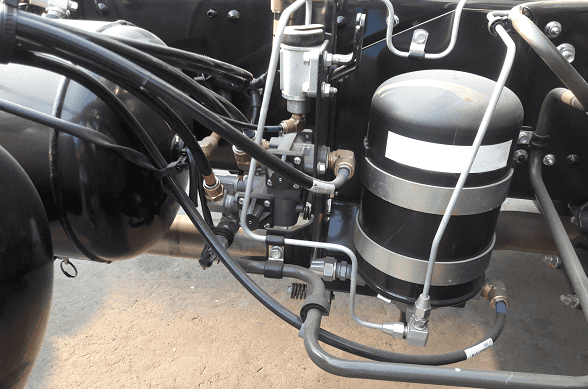
Air tanks are crucial components of an air brake system, storing the compressed air necessary for effective braking. Ensuring that these tanks remain securely attached to the vehicle is vital for maintaining system reliability and safety. An insecurely mounted air tank can lead to ineffective braking and potential system failures. Begin the inspection with a thorough visual check to confirm that the air tanks appear securely attached to the vehicle’s frame. Look for any signs of looseness, rust, or corrosion around the mounting points. Pay close attention to the mounting brackets and hardware, ensuring that they are intact, free from damage, and securely fastened.
After completing the visual inspection, perform a physical check by attempting to move the air tanks. Grasp each tank and apply moderate force to see if it shifts or moves from its position. Any unusual movement may indicate an insecure air tank or a loose mounting bracket, which requires immediate attention. Additionally, inspect the tightness of all bolts, nuts, and other hardware securing the tanks. Loose hardware can compromise the stability of the air tanks and should be tightened or replaced as necessary. An inspection of the vehicle’s air tanks should specifically check for defects such as insecurely mounted air tanks, ensuring that any issues are promptly addressed to maintain the safety and reliability of the air brake system.
Air compressors must be securely mounted onto the engine, with all supports or brackets firmly in place to ensure stability. It is essential to inspect air compressors with the engine stopped to avoid any hazards or inaccuracies in assessment. For belt-driven compressors, it is important to inspect the condition and tension of the drive pulleys and belts. Drive pulleys must be securely attached and in good condition to function correctly. The belt should have a slight give when firm hand pressure is applied, indicating proper tension. Excessive belt movement suggests that the belt is too loose, which can affect the compressor’s performance. A belt that is loose, cut, or frayed is considered defective and must be replaced immediately.
During the inspection of a vehicle’s air compressor, several key areas should be checked for defects. These include ensuring that the air compressor drive belt pulley is not loose and that the drive belt itself is not loose, cut, or frayed. Additionally, the air compressor mounting, brackets, and fasteners must all be secure to prevent any operational issues. Identifying and addressing these defects promptly is crucial for maintaining the efficiency and safety of the air brake system.